On the main list pages, a view bar above the table lets you filter records, pick and reorder columns and save the result as a named view. Choose Save view to keep it for yourself, make it your default, or (if you are an administrator) share it with the whole organization. Tick the checkboxes beside rows to update or delete several records at once.
In this guide
Where can I use saved views and filters?How do I filter a list with several conditions?How do I show, hide and reorder columns?How do I save a view and make it my default?How do I rename, share or delete a saved view?How do I update or delete many records at once?Where are the filters on a phone or small screen?Frequently asked questions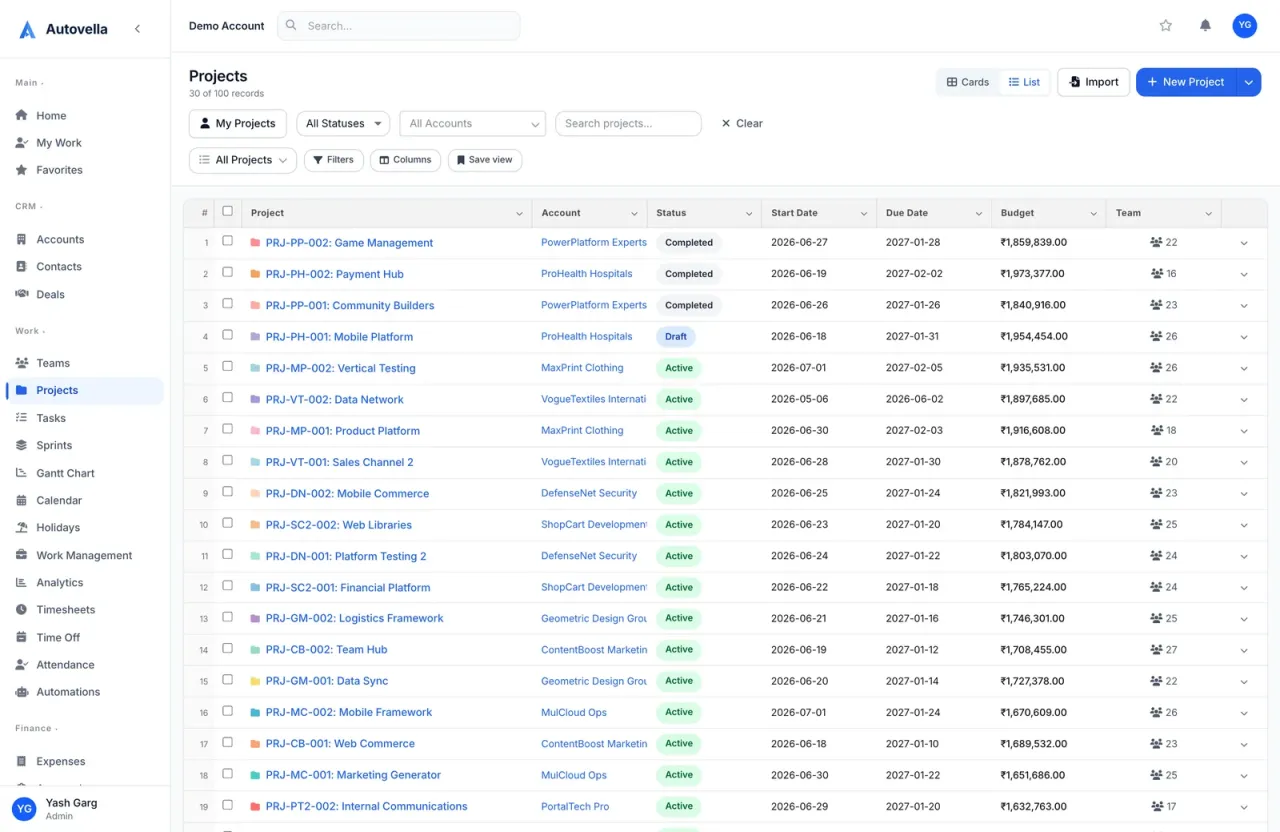
Where can I use saved views and filters?
The view bar appears on these list pages: Accounts, Contacts, Deals, Tasks, Projects, Invoices, Expenses, Attendance, Time Off and Holidays. Views are kept separately for each page, so a view you build on Deals never shows up on Tasks.
The bar has four controls, left to right:
- The view selector, which shows the active view or All followed by the page name (for example All Projects).
- Filters, with a count badge when conditions are applied.
- Columns.
- Save view.
Each page also keeps its own quick controls, such as a search box, a status dropdown or a My Tasks / My Projects toggle, next to the view bar. Those quick filters combine with whatever view you have selected.
Good to know. You only see rows you are allowed to see. A view narrows what is shown; it never reveals records your role or sharing settings hide. See How Access Works.
How do I filter a list with several conditions?
Click Filters to open the filter panel, titled Filter followed by the page name. Add one or more conditions, each made of a field, an operator and a value, then click Apply. Cancel closes the panel without changing anything and Clear all empties every condition.
When you have more than one condition, choose whether a record must match all of them or any of them. The operators offered depend on the type of field:
- Text fields: contains, is, is not, starts with, is empty, is not empty.
- Choice fields (such as status or priority): is, is not, is empty, is not empty.
- Number fields (such as budget): =, not equal, greater than, at least, less than, at most, is empty, is not empty.
- Date fields: on, before, after, is empty, is not empty.
- Yes/no fields (such as the project Template flag): is.
For example, on Projects you could combine Status is Active with Budget greater than a figure of your choice to see large live projects, or switch to any to see projects that are either On Hold or Cancelled.
The fields you can filter on are specific to each page and are not the same as the columns. If a field you expect is missing, check the column list or ask your administrator whether it is a custom field.
How do I show, hide and reorder columns?
Click Columns to see every available column with a checkbox. Tick the ones you want, use the up and down arrows beside a column to change its position, then click Apply. If you untick everything, Autovella falls back to the page's default columns.
Your column choice is remembered in your browser for that page, so it is still there next time. You can also drag column edges to resize them; those widths are saved along with a view when you save one.
Tip. Columns can include extras that are hidden by default, such as Created By and Modified on Projects. Add them when you need to audit who created what.
How do I save a view and make it my default?
Set up your search, filters and columns the way you like, then click Save view. In the Save list view window:
- Type a View name, for example Active Customers. A name is required for a new view.
- Tick Make this my default view if you want the page to open with it every time.
- Administrators also see Share with the whole organization. Leave it unticked to keep the view personal.
- Click Save. You will see a View saved message.
A saved view stores your search text, the filter conditions (including all or any), the visible columns in order and any column widths you set.
Update an existing view
Select a view, change the filters or columns, and click Save view again. You can choose Update followed by the view name to overwrite it, or Save as a new view to keep the original.
Switch between views
Open the view selector. Your own views are listed under My views and organization-wide ones under Shared views. Pick All followed by the page name to go back to the unfiltered list. A view that is your default is marked (default), and the page remembers the last view you used if you have no default.
Build the list you check every morning
Filter, arrange the columns, save the view and set it as your default. See the full set of list tools in Autovella.
How do I update or delete many records at once?
Tick the checkbox at the start of each row, or the checkbox in the table header to select every row currently shown. A colored bar appears showing how many rows are selected. The actions on it depend on the page and on your permissions:
- Tasks: Assign To and Set Status (if you can update tasks), Delete (if you can delete tasks) and Clear.
- My Work: a bar at the bottom of the screen offers Status, Priority and Complete for the selected tasks. See My Work, Search and Favorites.
- Accounts, Contacts, Deals, Projects, Invoices, Expenses, Attendance and Time Off: Delete (only if your role allows deleting that record type) and Clear.
Click Clear to deselect everything. Deleting asks for confirmation first, and if some deletions fail you will see Some deletions failed and the list refreshes so you can see what is left.
Deleted by mistake? Deleted records go to the recycle bin where an administrator can restore them. See Recycle Bin and Audit Log.
If you do not see the checkboxes at all, your role does not allow you to change or delete that record type. Ask your administrator to review your role in Roles, Permissions and Team Sharing.
Where are the filters on a phone or small screen?
On the Tasks page, the search box and filter controls are tucked away on small screens. Tap the filter icon button beside the List and Board switch to expand or collapse them. On larger screens they are always visible. The view bar itself scrolls sideways if it does not fit, so swipe along it to reach Columns and Save view.
On Tasks, the quick Filter button opens a small panel with Project, Priority, Status and Assignee, and shows a count badge when any are set. It works alongside the more flexible Filters builder in the view bar. For board and calendar layouts see Tasks, Boards, Lists, Calendar and Gantt.
Frequently asked questions
Accounts, Contacts, Deals, Tasks, Projects, Invoices, Expenses, Attendance, Time Off and Holidays. Views are stored per page, so a view on one list does not appear on another.
Administrators, and anyone allowed to update company settings, can tick Share with the whole organization when saving. Everyone else can still use shared views but only edit their own personal ones.
Your search text, the filter conditions and whether they match all or any, the visible columns in order, and any column widths you set.
Tick Make this my default view when saving, or use the star beside the view in Manage views. The page then opens with that view each time.
Row checkboxes and the Delete action depend on your role. If you cannot change or delete that kind of record, the controls are hidden. Ask an administrator to adjust your permissions.
Deleted records move to the recycle bin, where an administrator can restore them. Check there before recreating anything.