In Autovella the path from sale to payment runs through six connected steps: win the deal, use Convert to Project, plan the tasks, log time and expenses, get them approved, then use Generate from Project to create the invoice and record the payment. Each step feeds the next, so nothing is retyped.
In this guide
How does work flow from lead to invoice?Step 1: How do I win a deal and prepare it for conversion?Step 2: How do I convert the deal into a project?Step 3: How do I plan the project and add the team?Steps 4 and 5: How are time and expenses captured and approved?Step 6: How do I generate the invoice and record payment?How do I keep the whole workflow running smoothly?Frequently asked questions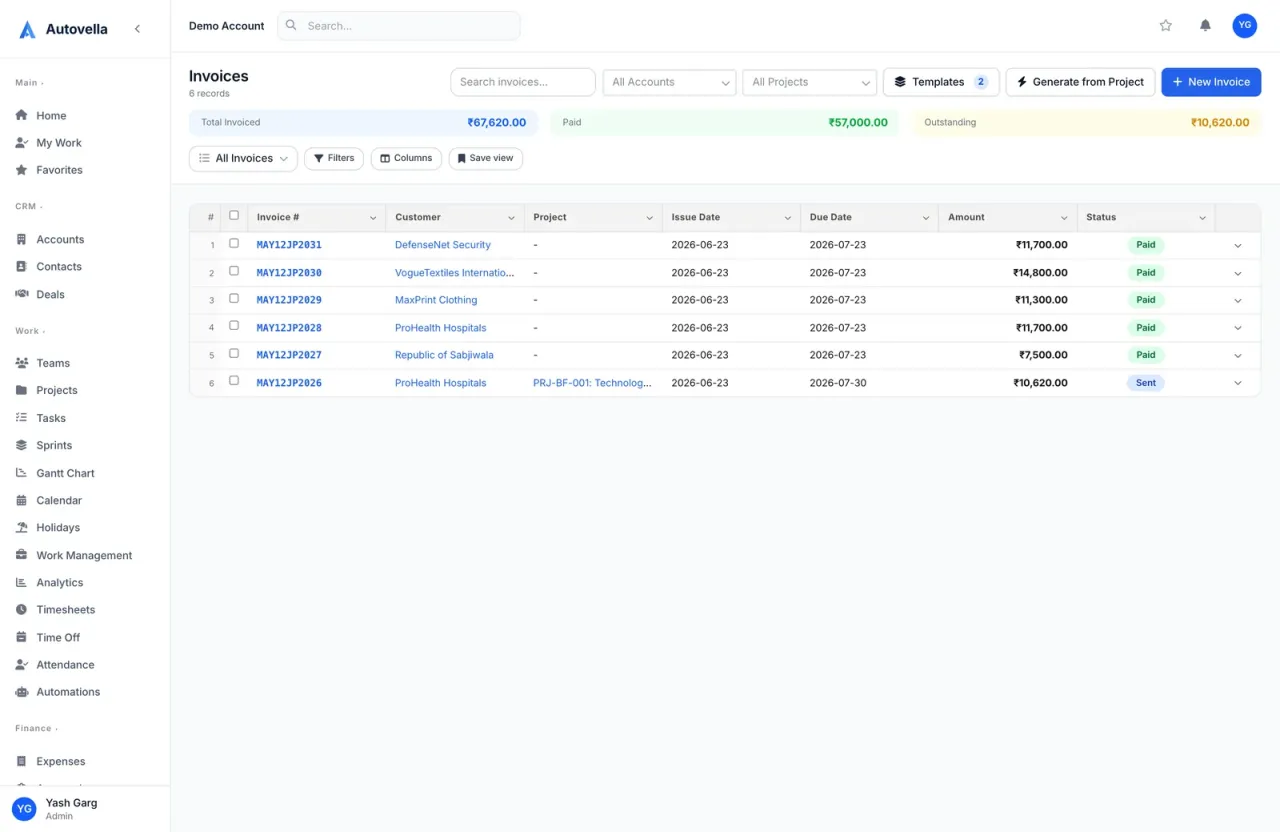
How does work flow from lead to invoice?
Here is the whole journey at a glance. Each step is covered below, with a link to the full article for that module.
- Sell. Track the opportunity as a Deal on an Account.
- Start delivery. Click Convert to Project on the won deal.
- Plan. Organize the tasks, team and dates on the project.
- Do the work. The team logs time on Timesheets and costs on Expenses.
- Approve. A manager or finance user approves the entries on Approvals.
- Bill and collect. Use Generate from Project on Invoices, mark the invoice sent, and record the payment.
Which of these screens you see depends on your role and on which modules your organization has. Sales and billing steps are normally done by administrators and finance users; delivery steps by managers and team members. See Roles, Permissions and Team Sharing.
Step 1: How do I win a deal and prepare it for conversion?
Create or find the client under Accounts, add the people you deal with under Contacts, then open Deals and click New Deal. Give it a Deal Name, the Account and Contact, an Amount, a Close Date and an Owner. Move it through the stages from Prospecting to Closed Won.
Before you convert, open the deal, click Edit and use Add Line Item to list what you sold. Each line has an Item name, Qty and Unit Price. These lines become tasks in the project, so describe them in a way your team will recognize. Upload the signed contract or SOW under Documents if you want it to follow the work. If you need a quote first, use Create Quote on the deal.
Full details are in Managing Accounts, Contacts and Deals.
Step 2: How do I convert the deal into a project?
- Open the won deal and click Convert to Project. The button needs permission to create projects and disappears once the deal has been converted.
- Read the confirmation. If the deal has line items it states how many tasks will be created.
- If the deal has documents, choose which files to bring across. All are ticked by default.
- Click Convert.
Autovella creates a project using the deal's name, description, account, owner, amount as the Budget, and currency. Each line item becomes a task if you can create tasks, and the chosen files are copied over. The deal moves to Closed Won if it was not already, and shows View Project from then on. A deal can only be converted once, so convert when you are ready to start delivery.
Why convert instead of creating a project by hand? The project is linked to the same Account. That link is what makes the invoice step and the client's own view of their work line up. See Creating and Managing Projects.
Step 3: How do I plan the project and add the team?
Open the new project. On the Overview tab check the dates, Budget, owner and status, and change the status from Draft to Active when work begins. On the Team tab add the people who will work on it with Viewer, Editor or Manager access. Assigning someone to a task also adds them to the project.
On the Tasks tab, review the tasks created from your line items. Use Add Section to group them into phases and New Task to add anything missing, then set assignees, priorities and due dates. Switch between List, Board and Tree View as you prefer. If the dates slip, use Reschedule from the project's actions menu instead of editing every task.
Read more in Tasks, Boards, Lists, Calendar and Gantt. Larger teams may also want Resource Planner and Workload.
Go from signed deal to paid invoice in one system
See how Autovella connects CRM, delivery, time, expenses and invoicing so nothing is retyped.
Steps 4 and 5: How are time and expenses captured and approved?
Time
Each person opens Timesheets, picks the project (and optionally the task) in the empty row, and types hours into the day cells. Keep the Bill box ticked on rows you want to charge to the client and untick it for internal work. At the end of the week they click Submit Week. Entries stay as Saved drafts until then. See Time Tracking and Timesheets.
Expenses
For costs such as travel, open Expenses and click New Expense. Choose the Project, Date, Category, Amount and a Description, attach a Receipt and leave Billable to client ticked if you plan to pass the cost on. The expense starts as Pending. See Tracking Expenses.
Back on the project, the Health tab shows Task Completion, Billable Hours and Budget Used, so you can see how delivery compares with what you sold while the work is under way.
Approval
Open Approvals. The Timesheets and Expenses tabs list what is waiting. Tick entries and click Approve Selected, or Reject Selected with a reason. Admins, finance users and anyone granted the matching approve-all permission see everything. Managers and project owners see their direct reports and the projects they own.
This step is the gate for billing. The invoice generator only picks up approved time and approved expenses. If your first invoice comes out empty, an unreviewed timesheet or expense is almost always the reason. Approve weekly so invoicing never waits on a backlog. See Time Tracking and Timesheets.
Step 6: How do I generate the invoice and record payment?
- Open Invoices and click Generate from Project. You can also start from the project's actions menu if you are allowed to invoice.
- Fill in Customer, Project, From Date, To Date and Hourly Rate. Add a Tax Rate (%), Discount and Payment Terms if needed, then click Generate Invoice.
- Autovella turns every approved, billable timesheet entry in the range into a time line, and every approved expense into an expense line. The result is a Draft.
- Open the draft and click Edit to review the lines. Remove anything you do not want to re-charge, or use Add Custom Item for fixed fees. Click Save.
- Click Mark as Sent when the invoice goes to the client. To email it automatically, set up an automation with the trigger Invoice is sent. Use More and Print / Save as PDF for a copy.
- When money arrives, click Mark as Paid (it reads Record Payment once a partial payment exists). Enter the Amount Paid, Payment Date and Payment Method, then Confirm Payment.
A part payment moves the invoice to Partially Paid; when the balance reaches zero it becomes Paid. Anything unpaid after its due date turns Overdue. The invoice's look comes from your templates, see Invoice and Quote Templates, and tax setup is in Multi-currency and GST Tax Setup. Full invoice details are in Creating and Sending Invoices.
How do I keep the whole workflow running smoothly?
- Keep one account per client, and always link projects and invoices to it.
- Write deal line items as the tasks you want your team to see.
- Ask the team to log time daily and submit every week.
- Approve timesheets and expenses on a fixed day each week.
- Generate invoices at your billing cadence, for example monthly, using the date range.
- Watch the Invoices Overdue and Invoices Pending cards on the dashboard for chasing payment. See The Autovella Dashboard and Widgets.
- Automate repetitive handoffs, such as notifying finance when a timesheet is approved. See Setting Up Automation Rules.
For a deeper look at the billing half of this flow, see Billing a Project from Start to Finish.
Frequently asked questions
No. You can create a project directly or from an existing project. Convert to Project is a shortcut that carries the deal's account, budget, line items and files into a new project so you do not retype them.
The generator only includes approved time and approved expenses within the From and To dates for the chosen project. Check Approvals for entries still waiting, then generate again.
Yes. Open the draft invoice, click Edit and use Add Custom Item to add lines with a description, quantity and rate, such as fixed fees or milestones.
It moves to Closed Won if it was not already, and shows View Project instead of Convert to Project. A deal can only be converted once.
Mark as Sent updates the status and triggers the Invoice is sent automation. To email the customer, connect a mailbox and create an automation rule with the Send email action.
Yes. Enter a lower Amount Paid when you confirm the payment. The invoice becomes Partially Paid and you can record further payments until the balance is zero.